Tagged: children

Cookie Dough Meringue Bites- Day 1
It’s officially December and the run up to Christmas has started. It is such a hectic time of year. Already the car parks in town are full all day, every day and getting your Christmas shopping done becomes such a chore. That’s why I’m glad I finished a couple of weeks ago… haha. Anyway, I decided that as a special Christmas bonus, I will be doing a 12 days of Christmas series. Every day for the next 12 days I will be uploading a recipe for something you might like to do as a present, a dessert or a little Christmas nibble. It’s also easily made gluten free by simply using gluten free plain flour instead.

Today is a recipe for the little ones (or big ones) you might have running around your house this Christmas! These Cookie Dough Meringue Bites are delicious. The best thing is that they just feel so light, there is nothing too rich about them, but they are so sweet and delicious. Thank you to Meringue Girls and their amazing recipe book for this!
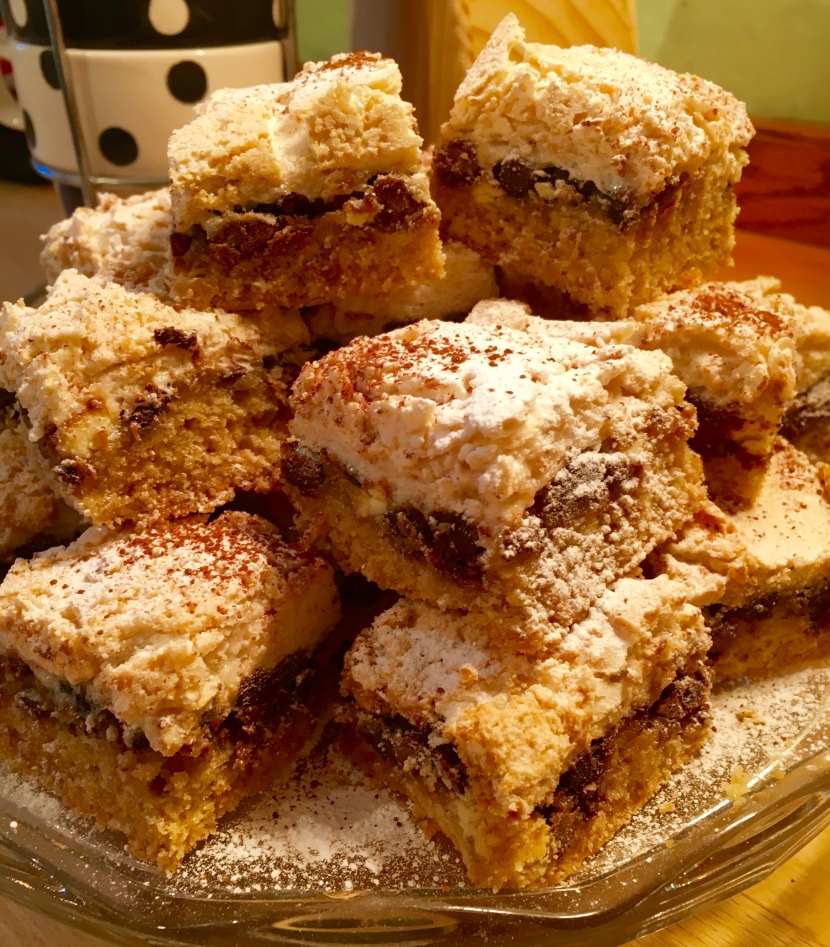
I baked these for family friends this weekend and took the rest to Brighton for some quality X Factor time (yes, there is such a thing as QUALITY X factor time!). They didn’t hang around long! So Happy 1st December, give these a go!
Ingredients
For the cookie dough base
250g plain flour, sifted
1/2 tsp bicarbonate of soda, sifted
170g unsalted butter, melted
100g golden caster sugar
1 tsp vanilla extract
1 egg
1 egg yolk
325g chocolate chips- I used a mixture of white, milk and dark chocolate
For the meringue topping
120g egg whites (about 4 medium eggs)- I use two chicks egg whites
240g caster sugar
Method
- Preheat the oven to 180c and line a shallow baking tray with greaseproof paper.
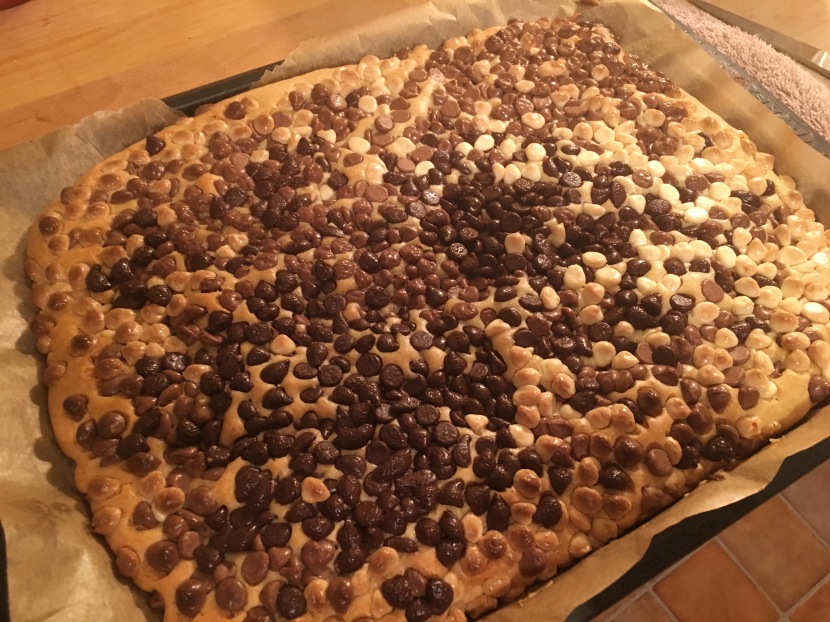
- Make the cookie dough. Cream together the butter and sugar until light and fluffy. Beat in the vanilla, egg and egg yolk then add the sifted flour and bicarb and combine into a smooth dough. Turn the cookie dough into the prepared tin and flatten with your hands to an even layer. Then scatter the chocolate chips over the top and press them down lightly into the dough.
- Bake the base for about 15 minutes (check and bake for longer if it’s not cooked). You still want it to be soft, it will harden as it cools.
- Next we make the meringue mixture. Turn the oven up to 200c. Heat the caster sugar in a lined tray for about 5 minutes. Meanwhile whisk the egg whites until they form stiff peaks. You should be able to hold the bowl upside down over your head!
- After 5 minutes, remove the sugar from the oven and reduce the temperature to 180c, then, with the egg whites still whisking, spoon a tablespoon at a time of sugar into the eggs until it’s all added. Continue whisking on a high speed for 5 minutes until the mixture is smooth and glossy and forms a stiff peak on your finger.
- Spoon the meringue mixture on top of the cookie dough base and spread into a smooth layer. Place a piece of greaseproof paper on top of the meringue mixture and press down lightly. Bake for 10 minutes, remove the baking paper, then bake for another 5 minutes.
- Remove from the oven and leave to cool completely in the tin before slicing up and serving!
The Perfect Vanilla Buttercream
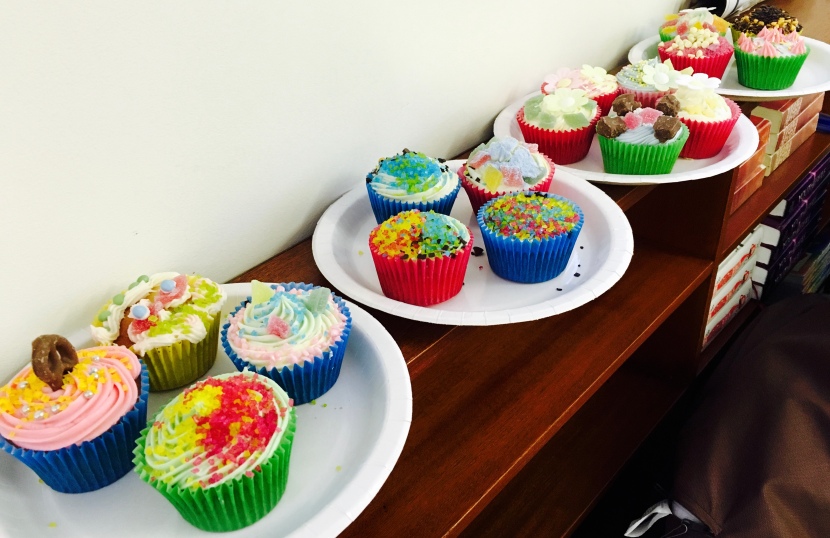
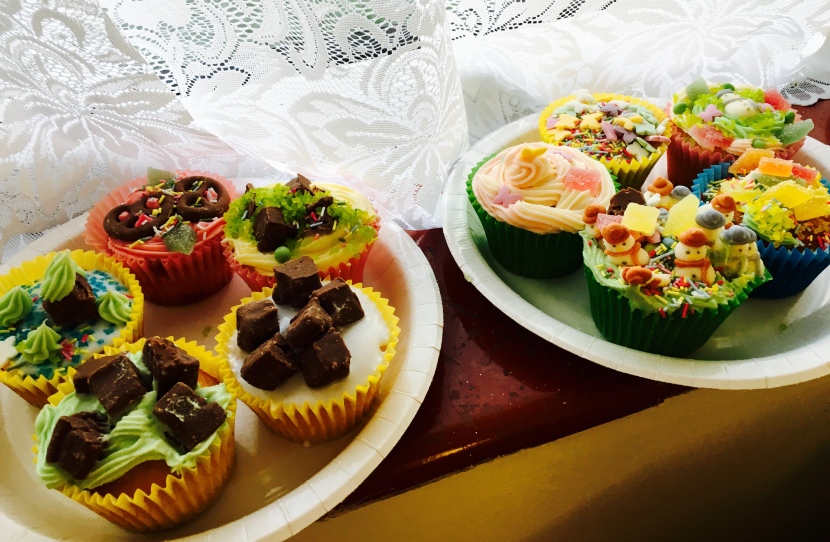
Hallo! It is a crazy busy time at the moment, so I don’t often find a lot of time to bake new things, which is making me sad. However, this week has been so much fun. On Tuesday, I worked with a group called Art Talk (take a look at their website here) I spent the afternoon icing and decorating 50 cupcakes with a group of wonderful adults who also happen to have severe learning difficulties. Art Talk provides a space in which they can express themselves through talking, signing and the visual arts.
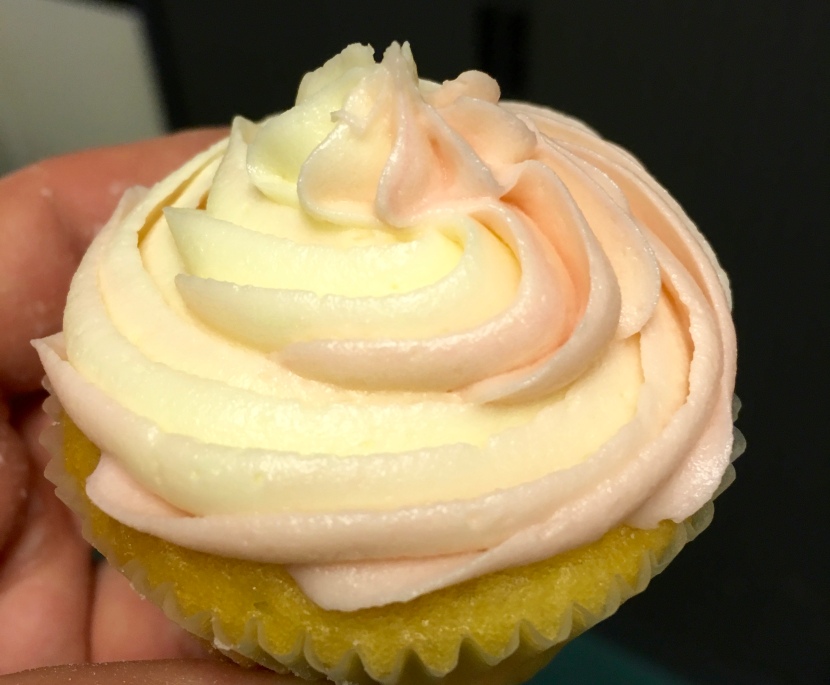
I have spent months searching for the perfect buttercream consistency, and I finally think I’ve found it! After baking 50 cupcakes for Tuesday and then preparing for lots of cupcake decorating today with a different group, I certainly had time to practice. This buttercream is sweet, light and fluffy and can be used for cupcakes or icing a layer cake. I’ve swirled in some pink coloured icing here too for a swirly effect. Find the recipe below, but first, take a look at these cupcakes that were decorated by the lovely adults I worked with at Art Talk. So great!


Ingredients
This recipe is enough to ice approximately 50 cupcakes or 1 three layer cake. You could also substitute the teaspoon of vanilla extract for another extract.
1kg icing sugar, sifted
320g unsalted butter, softened and cubed
100ml whole milk
1 teaspoon vanilla extract
Food colouring (optional)
Method
- Sift your icing sugar into your free standing mixer or large bowl ready to be mixed. Place the chopped, softened butter on top of the icing sugar.
- Using the paddle attachment or with a handheld electric whisk, mix on a slow speed until the icing sugar and butter are sandy in consistency.
- Add the vanilla essence to the milk and in a long, slow stream and once fully combined, turn your mixer speed to high and whip that icing until light and fluffy!
- Add colouring by separating into separate bowls for multiple colours, or for just one colour you can leave in the large bowl. I recommend using gel based colours and never the liquids you find in tiny bottles. Trust me, it’s worth spending that extra 50p! Careful not to add too much colouring or it will taint the flavour of the icing and it’s not too nice.
Harriet x
Classic Victoria Sponge
Now I may love experimenting with new flavours, techniques and combinations, but I also love a good classic. There is no simpler cake than the Victoria Sandwich. All ingredients weighing equal measures, it’s a cake that is so easy to double or change completely. It’s essentially a blank canvas!

I like looking into the history of cakes and discovered this from an article in the Telegraph:
As a child, Queen Victoria wasn’t allowed sweet things often. On the throne, she made up for lost time. Every week each of Victoria’s royal residencies received a consignment of pastries from the Buckingham Palace kitchens including: ’16 chocolate sponges, 12 plain sponges, 16 fondant biscuits, one box of wafers…one and a half dozen flat finger biscuits…one princess cake and one rice cake’. It is fair to say that the queen adored cake.
There is argument that the Victoria sponge in fact started out as a cake for children as they were advised against eating the traditional fruit cakes served- seeds and fruits were not for children! It wasn’t until later that this delicious sponge made it to the adult’s table.

Adding whipped cream was a 20th century addition, so if you wish to be more purist in your recipe, simply stick to the layer of jam in the middle. I chose to add whipped cream and a layer of fresh raspberries with the raspberry jam, but you really can change this cake in whichever way you wish according to season and what your tastebuds fancy. Many bakers substitute the flavour jam for more exotic flavours or simply another flavour jam such as apricot or marmalade.

As for the recipe for the cake itself, this has been my favourite for a long time found in Mary Berry’s Complete Cookbook. Let me know if you try anything more adventurous, or even if you just stick to this classic!
Ingredients
175g soft butter
175g caster sugar
3 eggs
175g self-raising flour
1 1/2 teaspoons baking powder
Raspberry jam
Fresh raspberries (optional)
200ml whipping cream, whipped until thick
Method
- Preheat your oven to 180C / gas mark 4. Lightly grease and line the bottom of two 18cm tins with baking parchment,
- Combine all the cake ingredients in a large bowl and beat well until smooth. Approximately 2 minutes.
- Divide the mixture between the prepared tins and level the surfaces. Bake for about 25minutes or until the cakes are well risen, golden and springy to the touch.
- Turn out onto a wire rack and peel off the lining paper. Leave to cool.
- Spread your jam on one layer of the cake, nice and thick. Spread the whipped cream on the other layer. If you’re using raspberries too, assemble them in your cake before sandwiching the two layers together. Sprinkle a little caster sugar on top et voilà!
Harriet x
Vanilla Funfetti Cupcakes
What a weekend! So much baking, and so little time. I finally had a chance to make these lovely little Funfetti Cupcakes. When you bite into them, they are just dotted with so many bright colours. I did however have a nightmare with my piping bag- it split! I pushed through and managed to finish them off, but not my best work- now to wait for a new one to arrive!

The sprinkles I ordered from America arrived and had exactly the desired effect. I found previously that any sprinkles I’ve found in the UK just don’t have this same effect, but perhaps some of you might have more luck?

These were whipped up so quickly, they are super easy, make a perfect batch of 12 and even if you don’t have the sprinkles, I bet most of you will have these ingredients just sat in your cupboard. They could be decorated in any other way, so ideal if you just fancy a quick tasty treat.

Let me know what you think! Apologies for the weird colour of the photos- I was in a rush to get out the house (and to eat one of them..)

Ingredients
for the cakes
115g butter, cubed
115g caster sugar
2 large eggs
115g plain flour, sifted
1 teaspoon baking powder, sifted
4 tablespoons whole milk
2 teaspoons vanilla extract
4 tablespoons Rainbow Jimmies
for the buttercream
200g icing sugar
200g butter
1 teaspoon vanilla extract
Method
- Preheat your oven to 180C / 350F and line your muffin tins with paper cases.
- Cream together the butter and sugar until pale in colour. Beat in the eggs, flour and baking powder.
- Add in the milk and mix until combined and add the vanilla extract. Finally, add your sprinkles if you are using them!
- Divide the mixture evenly between your cases. I use an ice cream scoop and fill the cases 2/3 full.
- Bake for about 15 minutes, or until risen and golden. Remove from oven and leave to cool completely on a wire rack.
- While your cakes are cooling, make the buttercream icing.
- Beat the butter until soft and smoother in texture. Sift in the icing sugar and beat until combined. Finally, add the vanilla extract.
- Pipe or spoon the buttercream onto your cakes- I use the star nozzle for my piping. Then decorate with your choice of decorations.
Harriet x
Marbled Cupcakes
Good afternoon! Sorry for the lack of posting yesterday. I was at a BEAUTIFUL wedding on Tuesday and didn’t make it back until late last night. So to make up for it, here is a lovely recipe for marbled cupcakes. Such an easy recipe, great to do with kids and they produce a moist, crumby cupcake, not too rich thanks to the mix of chocolate and vanilla.

I made these for some neighbours to say thank you for helping out after a bit of a family health breakdown, and they went down a storm. So don’t expect them to hang around long!

Ingredients
For the sponges
80g unsalted butter, softened
280g caster sugar
240g plain flour, sifted
1 tablespoon baking powder, sifted
1/2 teaspoon salt
20g cocoa powder, sifted
2 large eggs
240ml whole milk
1/2 teaspoon vanilla extract
For the chocolate icing
200g icing sugar, sifted
50g cocoa powder, sifted
80g unsalted butter, softened
25ml whole milk
For the vanilla icing
250g icing sugar, sifted
80g unsalted butter, softened
25ml whole milk
1/4 teaspoon vanilla extract
Method
- Preheat the oven to 190C / 375F / Gas mark 5 and line your muffin tins with cases. Make sure you are using muffin cases as this recipe makes far more if you use normal cupcake cases which are smaller.
- Make your chocolate sponge first. Mix together half of the stated butter, sugar, flour, baking powder and salt with all of the coca powder stated on a low speed until the mixture resembles breadcrumbs.
- Whisk the eggs with the milk by hand in a jug and pour half into another jug. Set aside this other half for the vanilla sponge. Pour three quarters of one jug into the chocolate mixture and mix on a medium speed until smooth and thick, add the remaining quarter until all the ingredients are incorporated and the batter is smooth. Make sure you remember to scrape down the sides of the bowl for any ingredients that might have been missed.
- Repeat the above for the vanilla sponge with the remaining ingredients, but without the cocoa powder. Whisk the vanilla extract into the egg and milk mixture in your second jug and repeat the same process- three quarters of the mixture, followed by the last quarter.
- Fill your muffin cases with the chocolate mixture until 1/3 full. Top this with the same amount of vanilla mixture and then use a thin implement such as a teaspoon handle to swirl the mixtures together. Be careful not to “over swirl” otherwise you will just end up with no marbling!
- Bake for 18-20 minutes until well risen and springy to the touch. Let them cool in the tins for a few minutes before transferring them to a wire rack to cool.
- Meanwhile, make the two icings. To make the chocolate icing, whisk the icing sugar with the cocoa powder and butter on a low speed until sandy in consistency. Then pour in the milk whilst mixing on a slow speed then increase the speed until it is soft and fluffy.
- Repeat this step for the vanilla icing but use no cocoa powder and mix the vanilla essence with the milk before pouring into the icing.
- When your cakes have cooled and are ready to be iced, you can either spread one tablespoon of each frosting on each cake and swirl the two for a marbled effect or you can pipe them like I did. To do this, fill your icing bag so that one side is chocolate and the other is vanilla and start piping!
Enjoy! I’ll have another post for you all tomorrow.
Harriet x
Review: Cereal Killer Café

What a dark and dreary Monday. Nothing like the weekend I have just had! After months of waiting, I finally had a chance to check out the Cereal Killer Cafe on Brick Lane in London, founded by Gary and Alan Keery, twins from Belfast. I am often told that I eat far too much cereal, but it is such a comfort food. And more people need to uncover the joy that cereal brings!!

That’s why this past weekend, Rich and I spent some of our time checking out this wonderful little cafe in Shoreditch. At peak times, the queues for this place are insane, but wander in on a quiet time and you truly get to appreciate the quirky decorations and the delightful service. With over 120 different types of cereal from around the world, 30 varieties of milk and 20 different toppings, there is something here for everyone. Yes an enormous sugar rush, but who doesn’t love sugar? This is a baking blog after all… And I am now working on a couple of recipes that can incorporate my love for cereal!
 This nostalgic cafe displays memorabilia from the 80s and 90s for you to feast your eyes on whilst you dig in to your sugar feast, all making for a great experience. Plus, who says cereal is for the mornings, this place is open until 8pm Monday-Wednesday and until 10pm Thursday-Sunday! Finally, someone who understands my feelings about cereal.

I’ve read mixed reviews about the Cereal Killer Cafe, some talking about this incredible place, others complaining about it’s prices and the hype. As far as I am concerned, I think this place is fantastic, and considering how much they could charge, being in London and creating such a different experience, I think the prices are completely reasonable. They aren’t selling food, they are selling the experience and the chance to relive your childhood and leave the dark and dreary world outside.


left: chocopottomus £4
cocopops/krave/kinder happy hippo/chocolate milk
right: absolutely no idea, something with bananas, i was too busy admiring the menu


The staff that served us were chatty and incredibly friendly, and very knowledgeable about cereal- always a plus working in a cereal cafe. I may not be coming here every day, but I will most certainly be back- next time with Rachel, my even more obsessed cereal loving friend. My only regret was not going with her first- Rich is not the worlds biggest cereal fan and almost killed my sugar high.
You can find them at:
139 BRICK LANE
LONDON
E1 6SB
Or their newer cafe in Camden:
MEZZ 2
STABLES MARKET
CAMDEN
LONDON
NW1 8AH
Have you ever been to the Cereal Killer Cafe? What did you think?
Harriet x
Apricot Slices
Just a quick one from me today! Lots to do and things to plan before a lovely weekend away in London. This is a recipe I came across in Cake Days (Hummingbird Bakery) when borrowing it from a family friend a while back and in order to say thank you, I just HAD to bake something from the book! They were on a low fat and low sugar diet at the time, and these Apricot Slices, despite still having sugar in them, take a lot of their sweetness from the fruit used. I’m going to be playing around with sugar-free recipes soon, so keep an eye out, but for now, these make a great after school treat or something to stick in your packed lunch for work.

Ingredients
200g soft dried apricots, roughly chopped
100g sultanas
50ml orange juice
200g unsalted butter, chilled and cubed
150g wholemeal flour
150g rolled oats
1/2 teaspoon finely grated orange zest
75g soft dark brown sugar
75g soft light brown sugar
Method
- Preheat the oven to 170 C / 325 F / Gas mark 3 and line your baking tray with baking paper.
- Mix the apricots in a bowl with the sultanas and orange juice and leave them to soak for a couple of minutes.
- Put the butter in a separate large bowl with the flour, oats and orange zest. Using your hands, rub all the ingredients together until they are in a crumb like consistency, no lumps of butter. Then stir in the two sugars.
- Drain the orange juice from the dried fruit and stir the fruit into the oat mixture making sure it is well distributed.
- Tip the mixture into the prepared baking try and press it down into the base and corners of the tin using the back of a wooden spoon. Bake for 25-30 minutes or until a deep golden-brown colour.
- Remove from the oven and allow to cool in the tray before cutting into slices.
This recipe can also stand to be adjusted and made naughtier by drizzling chocolate over the top, or simply changing the sultanas for another dried fruit. The choice is yours!
Harriet x
