Tagged: showstopper
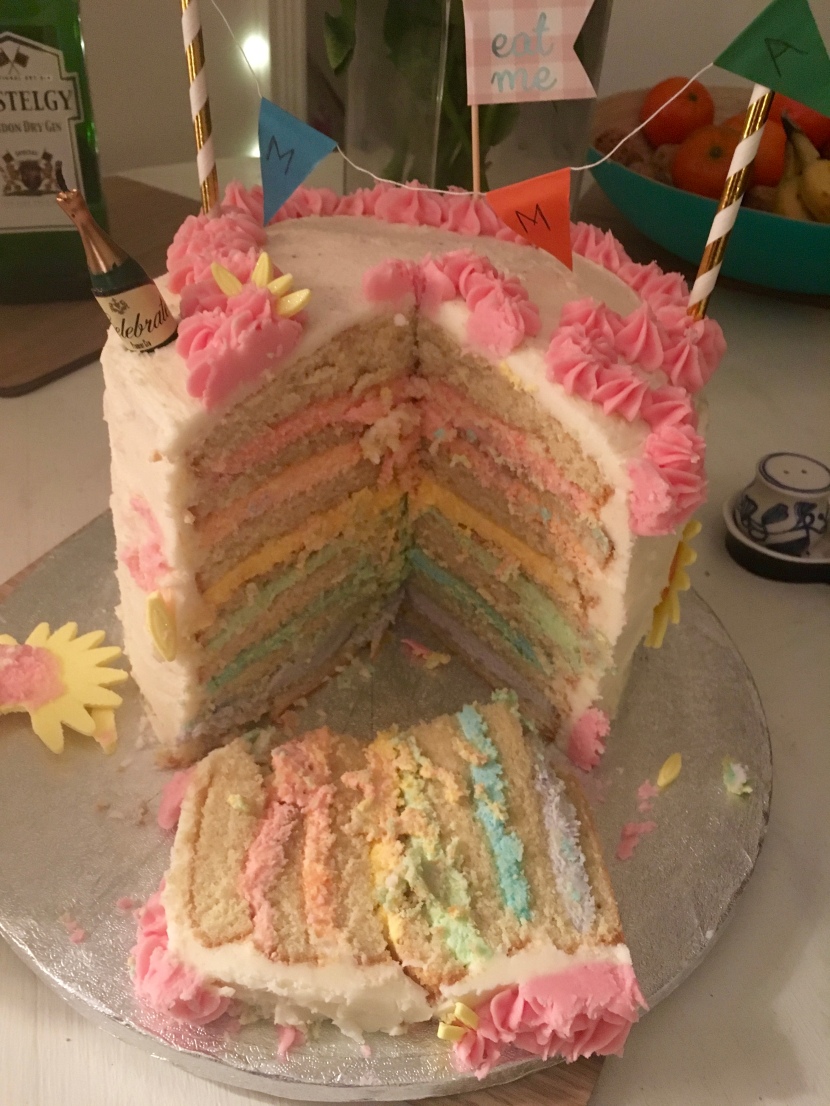
Rainbow Lemon Celebration Cake
Wow, it has been quite some time since I last had a chance to blog. Unfortunately, due to a combination of factors such as time in Calais and a problem with my hands, I just haven’t been able to bake but this week, I got back on the baking wagon to celebrate my gorgeous friend Emma’s birthday!

It has long been tradition that I bake the birthday cakes for 5 of the best girls in the world- a tradition I don’t plan on stopping any time soon! So this time, I made a lemon sponge with a surprise inside- rainbow icing! The sponge is perfectly moist, much like that you would find in a lemon drizzle cake, but with buttercream instead of the drizzle. Honestly, this cake is so easy- you just need patience!
I hope I won’t be disappearing for a long period now, as I have a few more recipes lined up! Enjoy this one and stay tuned for next week- I believe it could be Oreo related… Happy Birthday gorgeous girl!

Ingredients
For the cake
450g unsalted butter, softened
450g caster sugar
8 large eggs
finely grated zest 2 lemons
450g self-raising flour
For the icing
2 batches of the following:
150g unsalted butter
55g vegetable shortening (I used Trex)
910g icing sugar, sifted
120ml double cream
Method
- Preheat the oven to 180C/fan 160C/gas 4. Beat together the butter and caster sugar until pale and creamy, then add the eggs one at a time, slowly mixing through. Remember to keep scraping down the sides of the mixing bowl throughout.
- Sift in the flour, then add the lemon zest and mix until well combined. This recipe is enough to fill 4 round 8-inch cake tins. Line your tins and fill them all equally, then level them with a spoon.
- Bake for 25-30 mins until a thin skewer inserted into the centre of the cake comes out clean.
- Leave your cakes to cool completely before attempting to cut the layers in half. This cake only requires 7 layers, so do what you wish with the final layer. I have read some lovely ideas such as making cake pops or a tiny replica cake with the final layer. Choose a serrated knife if you don’t have a cake leveller (you can buy one here) and cut around the edge rather than slicing right through if you do use a knife- otherwise you may end up with wonky layers!
- Whip up your first batch of buttercream by combining the vegetable shortening and the butter and beating until well combined. Next you want to add your icing sugar, about 300g at a time and add some of the double cream after each portion of sugar. Keep beating until the mixture is well combined and fluffy.
- Divide this batch equally into 6 small to medium bowls. This is where you choose which colours you would like for your icing! I use Wilton Gel Colouring– the pots last for years and you really do only need the tiniest addition to get a rich colour. Try to avoid using liquid food colouring. If you don’t have the pots of gel colouring, then try the Dr Oetker gel which is readily available in most supermarkets. Mix your icing with a fork until you achieve the desired colour.
- Now it’s time to start layering your cake! Place your first layer on a cake board and smooth your first choice of icing colour over the top. Try to go up to half an inch from the edge of your cake to avoid it spilling over into the final layer- gravity really will push that icing to the edge! Next, place another layer of cake on top and smooth the next colour of icing, repeat until you reach the final layer.

- Now it’s time to whip up another batch of the icing, this time to coat the outside of the cake. Your first step is to crumb coat your cake. This means you want to do a thin layer of icing all over, not worrying if the cake is still visible through, but making sure all areas are covered. Stick the cake in the fridge for an hour after this, allowing the icing to harden. Now when you cover the cake with the remainder of the icing, you won’t have any crumbs coming through your buttercream!
- Cover the cake with the remaining icing using a palette knife. You can use this tool to create pretty patterns in the icing once completed or just decorate as you wish. I used some pink icing and piped to my heart’s content. I got the garland and straws from Tiger– a shop I could spend hours in!
- Happy eating!
Enjoy!
Harriet x
